Saturday 21 November 2015

Department name using default dimension value in AX 2012

We can get the department name in different ways using default dimension value.


1st Way: Using Views.


static void DepartmentName(Args _args)
{
    DefaultDimensionView        defaultDimensionView;
    DimAttributeOMDepartment    dimAttributeOMDepartment;

   //DefaultDimension  =  5637151660
    select DisplayValue from defaultDimensionView
        where defaultDimensionView.DefaultDimension == 5637151660
            && defaultDimensionView.name == 'Department'
        join dimAttributeOMDepartment
            where dimAttributeOMDepartment.Value == defaultDimensionView.DisplayValue;

    info(dimAttributeOMDepartment.Name);
}


2nd Way: Using Tables.


static void getDepartmentName(Args _args)
{
str                                                       name;
DimensionAttributeValueSetItem      valueSetItem; 
DimensionAttribute                           dimAttribute; 
DimensionAttributeValue                 dimAttributeValue;

//Get the Department name for '5637151660' default dimension.
select DimensionAttributeValueSet from valueSetItem 
where valueSetItem.DimensionAttributeValueSet == 5637151660
            join RecId from dimAttributeValue 
                where valueSetItem.DimensionAttributeValue == dimAttributeValue.RecId 
            join RecId from dimAttribute 
                where dimAttributeValue.DimensionAttribute == dimAttribute.RecId 
                   && dimAttribute.Name == enum2str(sysdimension::Department);
       
         name = DimensionAttributeValue::find(dimAttributeValue.RecId).getName();
        
        info(name);
 }


Thursday 12 March 2015

Adding Customer Address through x++ Coding


The Below code used to update or create address for an existing customer


static void BRR_Address(Args _args)
{
        CustTable                                  custTable;
        DirParty                                     DirParty;
        LogisticsPostalAddress             address;
        DirPartyPostalAddressView      addressView;
        LogisticsLocationRole               roles;


        custtable = Custtable::find("1304");

        address.Street     =   "DLF,";
        address.ZipCode    =   "500006";
        address.City       =   "CyberCity,";
        address.State      =   "TG";
        address.CountryRegionId = "IND";

        addressView.Party = custtable.Party;
        addressview.initFromPostalAddress(address);

        DirParty = DirParty::constructFromPartyRecId(CustTable.Party);
        roles = LogisticsLocationRole::findBytype(LogisticsLocationRoleType::Delivery);
        DirParty.createOrUpdatePostalAddress(addressView);
}

Wednesday 11 March 2015

Inserting Customer's Financial Dimensions through X++ code


The Below code is used for Inserting Financial Dimensions for a particular Customer through code.

static void BRR_Finance(Args _args)
{
  CustTable custTable;
  Struct struct = new Struct();
  container ledgerDimension;
  DimensionDefault DimensionDefault;
  ;
  //set the values
  struct.add("CostCenter", "OU_4740");
  struct.add("BusinessUnit","00000005");
  struct.add("Department","OU_4771");  
  struct.add("ExpensePurpose","Training");
  ledgerDimension += struct.fields();
  ledgerDimension += struct.fieldName(1);
  ledgerDimension += struct.valueIndex(1);
  ledgerDimension += struct.fieldName(2);
  ledgerDimension += struct.valueIndex(2);
  ledgerDimension += struct.fieldName(3);
  ledgerDimension += struct.valueIndex(3);
  ledgerDimension += struct.fieldName(4);
  ledgerDimension += struct.valueIndex(4);
   ttsBegin;
  DimensionDefault = AxdDimensionUtil::getDimensionAttributeValueSetId(ledgerDimension);
    //Select the Customer
  custTable = CustTable::find("2003",true);
  custTable.DefaultDimension = DimensionDefault;
  custTable.update();
  ttsCommit;
}

Saturday 7 March 2015

Finding Ledger Dimension by using MainAccount Number in X++


static void getLedgerDimension(Args _args)
{
DimensionAttributeValueCombination     dimensionAttributeValueCombination;
MainAccount                                             mainAccount;
;
select RecId,MainAccount from dimensionAttributeValueCombination
                join RecId from mainAccount
                  where dimensionAttributeValueCombination.DisplayValue == "1010"
                     && mainAccount.RecId == dimensionAttributeValueCombination.MainAccount;

info(strFmt("Ledger Dimension - %1",dimensionAttributeValueCombination.RecId));
}


                                                or 

we can find by using the method "getDefaultAccountForMainAccountNum()" which is available in DimensionStorage


static void getLedgerDimension(Args _args)
{
   DimensionStorage::getDefaultAccountForMainAccountNum("1010");
}

Tuesday 24 February 2015

How to open web site pages on AX Forms

Today I will demonstrate you that how you can show any webpage on your AX Forms.

1. Create New Form.
2. Right click the Design node of form and add ActiveX control.
3. Select Microsoft Web Browser from AciveX control window list.
4. Go to method node of form and override Init method of form.
5. Add below line of code
           
    ActiveX.Navigate("www.google.com");

Note: - ActiveX is the name of control which we have added in the form previously.


6. Now run your form and check the output

Saturday 21 February 2015

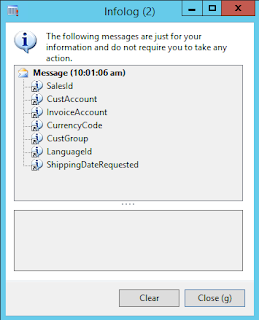
Finding the mandatory fields on table by using X++ code.


The below code is used to get the mandatory fields on table using X++.


static void CheckMandatoryFieldsOnTable(Args _args)
{
    DictTable   dictTable;
    DictField    dictField;
    int               i;
   //Pass the table name
    TableId       tableId = tablenum(SalesTable);
    ;

    dictTable = new DictTable(tableId);
    for (i=1 ; i<=dictTable.fieldCnt() ; i++)
    {
        dictField = new DictField(tableId, dictTable.fieldCnt2Id(i));

        if (dictField.mandatory())
        {
            info(dictField.name());
        }

    }
}


output :


Friday 9 January 2015

Query based SSRS Reports.

Overview

There are a multiple of methods to develop SSRS reports in Dynamics AX. This tutorial will guide you through the process of developing SSRS reports using an AOT query.

Pre-requisites

  1. Microsoft Dynamics AX 2012
  2. Visual studio 2012
  3. SQL Server report server must be configured
  4. Reporting services extensions must be installed in Dynamics AX

Steps

  1. First of all we need an AOT query which will fetch data from AX and display it in a report. For this tutorial, I am using an existing query in AX which displays a list of customers.
  2. CustTableListPage query will be used in this tutorial. To find this query, open AOT àQueriesàCustTableListPage.
  3. The development of the SSRS report is done in Visual studio. So a new project needs to be created in Visual studio.
  4. Open Visual studio. Go to File à New à Project.
  5. In the section Installed templates select Microsoft Dynamics AX and then select Report Model in the right pane. Name the project “QueryBasedDemo“. Press OK.


  6. A new project will be created as shown below:


  7. Now add a new report in the project by right clicking on the project QueryBaseDemo à Add à Report.


    1. A report will be added to the project with the name “Report1″. Rename the report toQueryBasedDemo.
    2. Now double click the report to open it.

  8. The description of the individual node is given below:
    1. Datasets: Datasets retrieve data from the AOT query. It acts as a bridge between AX and the SSRS report. Only the fields added in the datasets can be used in a report.
    2. Designs: It defines the layout of the report.
    3. Images: It contains the images that you want to display in the SSRS report.
    4. Data Methods: It contains the business logic which can then be used in the report.
    5. Parameters: It is used to apply filtering to the data in a report.
  9. First of all, we will create a dataset. Right click Datasets àAdd Dataset to create a new Dataset. Name it “CustTable”.


  10. Select the data source and open the properties window. Make sure the Data Source Type is set toQuery. Then select the Query field. An ellipse button appears. Click it to open a dialog.


  11. This dialog lists all the queries present in the AOT. Select CustTableListPage and press Next.

  12. Select the fields you want to display in the report and press OK. Only the selected fields in this dialog can be shown in the report.

  13. There are two types of designs that can be created in a SSRS report:
    1. Auto Design: Visual studio automatically creates a design based on the dataset provided. Auto design is the preferred method because it is easy and usually fulfills the requirements for the majority of scenarios.
    2. Precision Design: It is used when you need custom placement of fields or the layout of the report is too complex.
  14. In this demo we will use Auto Design. Now right click the Designs nodeàAdd àAuto Design. A new design is added. Rename it to Design. It is recommended that you set the name of the Design to either ‘Design’ or ‘Report’

  15. Now drag CustTable form the Datasets node and drop it on the Design node. A table will be created which contain all the fields present in the data set. These fields will appear in the same order in the report. So if you want to arrange the fields, right click the field and select either move up or move down.
  16. The final design will look as shown below


  17. Now we have to define the layout of the report. Visual studio provides built in templates. Select the Design and open the properties window. Select ReportLayoutStyleTemplate in the LayoutTemplatefield. Give a suitable title to the report.

  18. Select the CustTableTable under the Design node and open the properties window. SelectTableStyleAlternatingRowsTemplate in the Style Template field.


  19. Report is now completed can be viewed. To preview the report, select the Design node, right click it and select preview. A preview window opens.


  20. Select Report tab. The report appears as shown below:


  21. To view this report from AX, it needs to be added in the AOT and deployed at the report server.
  22. Open the solution explorer and right click the project. Select Add QueryBasedDemo to AOT. This will add the report to the AOT. It will also add the project in the AOT with same name so if you want to modify the report in future, you can use that project.


  23. Now open AOT in AX. Go to SSRS reports à Reports à QueryBasedDemo. Right click the QueryBasedDemo Report and select Deploy Element

  24. A success message will appear if the report is successfully deployed.
  25. To open the report in AX, a menu item is required. Create a menu item that will open the report from AX.
  26. Go to Menu items à Output. Right click Output and select New Menu Item

  27. Set the following properties on the menu item as shown below.

  28. Right click the newly created menu item and select Open to view the report

  29. A parameter form will open. If you want to add parameters to report, you can add it by clicking Select. Press Ok to continue.

  30. The report is displayed as shown below.

Saturday 3 January 2015

Creation of Sys Lookup in Microsoft Dynamics AX


Steps to create a Sys Lookup :-

1. Create a Table with fields ( AccountName,Account,City).

2. Create a Form and use  DataSource as created Table.

3. Expand the Form DataSource and Expand Fields.

4. Override the Lookup() method  on the field where the lookup has to appear (Example Field -  Account).

5. Write the following code.

public void lookup(FormControl _formControl, str _filterStr)
{

    SysTableLookup sysTableLookup = SysTableLookup::newParameters(tableNum(CustTable),_formControl);
    Query query = new  Query();
    QueryBuildDataSource qbds = query.addDataSource(tableNum(CustTable));
     super(_formControl, _filterStr);
     sysTableLookup.addLookupfield(fieldNum(CustTable,AccountNum));
    sysTableLookup.addLookupfield(fieldNum(CustTable,Currency));
    sysTableLookup.parmQuery(query);
    sysTableLookup.performFormLookup();

}

T